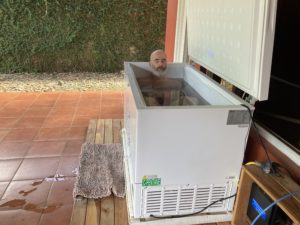
In this post I will show you the exact step-by-step process I used to build my home freezer ice bath set up. If you want one like mine, then follow along!
When you start your online research you will find there are many options for you to take. They range from compete ghetto to super pimped out… I wanted to make it easier for you and show you something that’s tried and tested….and to be honest, if I can do it in Nicaragua…anyone can.
Also, I want to be able to direct you to the best resources on the topic that I found as I was building.
By the end of this article, you’ll know how to build the same chest freezer – ice bath setup as me which includes digital temperature control, a filtration system and a sanitation solution at a low cost without a huge time investment.
If you have got this far I’m not going to explain the benefits of cold water immersion to you…I’m guessing you already know.
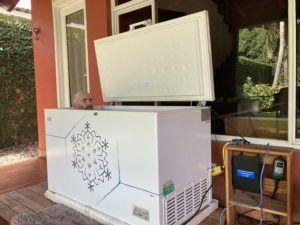
Here is a high level overview of the system I’ve been using for almost a year now.
I based the build on the recommendations outlined in the book “The Ultimate Chest Freezer Cold Plunge DIY Guide” by John Richter.
It’s a very comprehensive guide with 266 pages, covering pretty much every option you can think of….and lot of things you haven’t. John gives real world examples and also explains the problems of cutting corners…usually from his own experience.
You can get a copy of that book yourself by visiting his website.
https://chestfreezercoldplunge.com/
John also runs a Facebook group, where you can join in order to connect with other people who are converting chest freezers and you can ask questions as you go along. I did.
Step 1 – Plan it out.
You’ll need some things before you even think about buying a freezer.
1. Where are you going to put it. I’m fortunate to have an outdoor space, which means draining it is just a matter of pulling the plug out. If you are going to put it indoors you really need to think it the project through (by reading the rest of this post) because if it leaks you’ll be in deep doo doo.
2. Measure your space…these freezers are bigger than you think! Will it fit? Will the lid open, will you have enough room to get in and out?
3. How do you intend on draining it. Not really a problem if you are outside you can at least attach a hose to an external pump and then just pump the water out or pull the drain plug. Doing that indoors might not be so easy. An external pump with a hose to an existing drain is an option and in the worse case you can use a bucket.
4. You will need a way to fill it. Usually an outdoor hose is best.
With the obvious or not so obvious stuff out the way let’s talk about the fun stuff…freezer selection.
You’ll need to go to a store (if buying new) and try them out. Same goes for second hand. You have to sit in it first. It’s the only way to find out if you’ll fit.
Sure, you’ll feel like an extra from some Netflix crime show trying to work out if a body fits in a freezer but it will be worth it.
Part 1 Freezer Selection
I chose a freezer that was around 400 litres in capacity. It works for me and I’m a kinda skinny, 6 foot guy that weighs about 75kg. I also plunge at the same time as my girlfriend (she’s small), so 400 litres fit two of us in at the same time.
Don’t buy one with a metal interior, they rust.
Get one with a plastic interior. They are usually plastic coated metal but as long as you treat it nice and don’t scratch it it won’t rust.
You will also want to get one with a fully functioning lid. Don’t cheap out on a second hand one that has a busted lid.
Ideally it should lock as well, especially if you have kids that might be ‘curious’ and try and open it.
Once the lid is open see if it stays open. It’s not a deal breaker but it makes life a lot easier if you don’t have to hold the lid open or worry about it shutting o you everytime you want to use it.

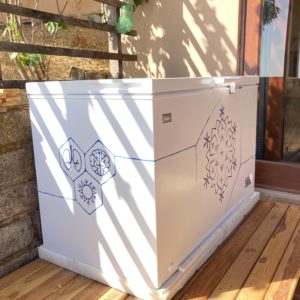
Once you get the freezer home, actually before you get it home, it would be worth thinking about what you put it on. You’ll notice I left mine in the polystyrene support box it came in. I did that because the feet of the freezer lift the body off the ground. With the weight of the water and a person it would bend in the middle and potentially damage the freezer. I looked at removing the feet but they are fixtures so I came up with the semi-perminant solution of leaving it in the supportive box.
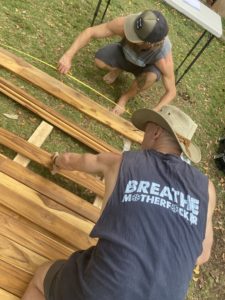
I also chose to make a teak deck for mine sit on. I did this to raise it off the floor because as you get out there will inevitably be water spillage that runs off the body. I didn’t want the water to somehow run onto the underside of the freezer and cause it to rust or go anywhere near the electrics so I decided to elevate it on a deck…plus I think it looks nice.
Part 2
Sealing the seams.
Ok – this is important. Freezers aren’t made to carry water. They have gaps in them, so you need to seal those gaps. It would make sense to do this with bathroom silicone sealant right? We’ll John Richter strongly advises against this. The reason being is that silicone sealant isn’t designed to sit submerged in ice cold water for long periods of time. It will break down and peel off. Instead he recommends using something called JB Weld. It’s way more expensive than silicone and it takes longer to apply and set but I think it will be worth it in the long run and I’ll tell you why.
At the same time I brought my freezer a friend of mine brought one as well.
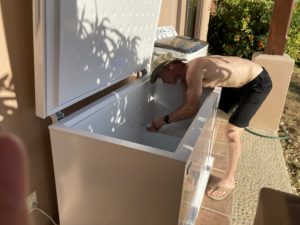
We can’t get the JB Weld in Nicaragua and debated what to do. I went for the cheap silicone option. I applied it carefully and check it whenever I clean out my tub, which is about once every 3 months. I’ve had to replace some areas over the year. My friend, being a contractor decided to sandpaper the seams. Remember I told you that some freezers are made of plastic coated metal… Well, he sanded down to the metal. No problem he thought and put on aquarium grade silicone. Unfortunately it started to rust and the silicone peeled off which led to a leak. This meant he had to take the freezer to bits and leave it out in the sun for a week to dry. Now, I’ve gotten away with normal silicone so far…but when I can get JB Weld down here I will.
Edit – (after 8 months my silicone started to peel off. I decided to peel it all off and add JB Weld which I had shipped to Nicaragua. Installing it took about 3 hours with a help of a friend and so far, 2 months in, it’s been great)
Most of the seams are pretty obvious, but some people forget the one that goes from around the top. This is the one where the walls meet the top frame. As you get in water may splash up there, so it’s important to seal that as well.
Some people seal the plug as it isn’t always water tight. That’s fine if you are inside and are planning on using a bucket or pump to empty, but I’m outside so I didn’t, and I just used some plumbers tape to seal it up properly.
There are alternatives to using the JB weld as well. You can buy a liner, basically a pond liner, and put that in. I haven’t tried that, but if you are worried about leaks it might worth sealing it and putting in a pond liner…belts and braces really.
Part 3
Controlling the temp
You can just turn it on and see what happens to the temperature, I did this for a while. There will be an ice build up which happens in rings around the location of the coolant components. This looks cool but is actually painful when you get in as ice can be sharp. In order to avoid this I recommend some sort of electronic thermometer, I use the . Basically, you put the thermometer probe in the water, plug the freezer into it and then the device into your circuit breaker.
When the water gets too hot it will switch on the freezer. When it gets too cold it will switch it off. It’s a game changer, as you know exactly how cold the water is all the time. I did a couple of months just by feel and how long I could stay in the water varied wildly due to the temperature fluctuations.
The inkbird also has a cool feature. When your water heats up to the correct setting it will wait a few minutes before switching on the freezer. It does this because the freezer has a compressor in it, and this ‘compressor delay’ is designed to extend the life of the compressor. This is great for countries like Nicaragua where we have 5 second power cuts daily. It means the compressor isn’t being regularly switched on and off in rapid succession which would damage it.
Part 4
Filtration
You will need something to clean out the debris in the water. You could use a net, similar to what people use to clean fish bowls but it won’t keep the water really clean. I use one of those when I need to but the thing that does the job properly is a water filter or water polisher.
John Richter recommends the Marineland Pump For Filtration and I have one, it’s good. But also I found this ghetto option which I really like and use this style of filter as well!
Part 5
Sanitation
I thought I could do without proper sanitation. My plan was to throw in some essential oils and some hydrogen peroxide to keep the bugs at bay, besides what bugs grow in freezing water? Well, it turns out that doesn’t work…at least not in a hot country. I had to change the water every 2 weeks using this method. It felt wasteful and also took the tub out of action for 3-5 days every time…yup that’s how long it takes the water to cool down.
I eventually bit the bullet and brought the Jed It works. No doubt about it. I just run it for about 45 minutes a day and it, along with the filtration system keeps the water crystal clear.
You can try alternatives like epsom salts, or hot tub chemicals but this works for me.
Part 6
Turning it on.
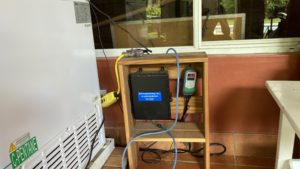
You should have your plugged into the wall. The one I recommend has 3 outlets and a light that shows you it’s on. When you come to use the freezer just press one of the buttons and it will switch everything off.
In the picture above you can see the yellow GFCI coming out from behind the wall. The outlet part of it is sitting on top of a small wooden stand that I built to house the ozone generator and the thermometer.
The first outlet will be for the filter pump. It needs to run all the time. This keeps the water moving and prevents stagnation plus it’s better for the motor – obviously you switch it off when you get in.
The second outlet will be for the thermometer.
The third is for the ozone generator (not plugged in permanently)
Therefore you have one switch to turn off all the electrics before you get in…easy.
Part 7
Using Your Ice Bath.
Now you are ready to jump in right? Well…you could, but I recommend you take a shower first. Then I would also recommend you put a shower mat by your tub so you can clean your feet on the way in and catch water on the way out.
Trust me on this.
The pre-game shower will keep your water a lot cleaner, and for some reason people want to get out of the cold water quickly which means they tend to bring a lot of water out with them!
The freezer doesn’t need much maintenance. The pump filters will need cleaning every couple of week – more or less depending on use. You can buy some special strips to check your ozone concentration is just right, John offers some guidance on this in his book, but I’ve done well with just 45mins run time a day.
Ok, that’s it, I hope you find this guide helpful and now feel less daunted by the prospect of filling an electric cubical up with water and sitting in it!
If you have any questions just post them below.
Disclaimer
Obviously this guide is for reference purposes only. If you electrocute yourself or damage a perfectly good freezer – that on you – not me. Cool?

Over the last 10 years Ed has been building a YouTube library to help people manage their own pain or movement limitations and increase performance through exercise. He regularly adds videos so be sure to subscribe and visit regularly


"Oh My Gosh- I am ALREADY feeling relief after a few days! I used to wake up 2-3 times a night with shooting pain that anti inflammatories couldn't touch. Now I have been waking up just because I want to notice what it feels like to lay in bed pain free- THANK YOU!."

"When I first started with your program I was experience a lot of pain. Walking was difficult. I had to stop and catch my breath every few minutes and lean against a wall for support. Now when I walk with my husband we go for over an hour. I never had to sit down and stop...and, hardly any pain!!! 😊😊 I can’t thank you enough."
Frustrated that you aren't recovering fast enough?
Discover how to heal from illness and injury using movement, food and lifestyle.
Leave a Reply